Pages

Showing posts with label Square Foot. Show all posts

Sunday, May 4, 2014

Potatoes 3 Ways.

Last year I did a longish post about spuds, promising this year to return to the scene of the crime and (hopefully) do better and have a more objective look at ways to grow them.

It's a good thing I keep a blog to remind me of things I was going to do, and when I did them - that being said, I should actually spend more time READING what I said I would do and when I would do it. I'd been looking at the date on that post and saying 'ohhhh yeah I did that in May.. so I'll put them out in April and actually be EARLY' - but if you read the link, you'll see that I actually planted those in February *facepalm* but it's all good. Win lose or draw we're going ahead with it!

The general methods you see surrounding potatoes all seem to follow the same principle: you plant your seed potato, then pile up the medium around them as the plant grows. The plant below ground then puts out roots and forms your spuds.  So I'm going to go about this 3 different ways, as well continue on the promised 'head to head' of commercially bought vs DIY methods, and finally, close out by combining different aspects of these methods into a 5 dollar garden experiment.. so - lots to cover.

Method 1. Containers

Last years tater pot
 Growing spuds in containers is pretty straight forward, and we covered it last year. Your growing medium (peat moss or something like it such as coconut coir) is put down in the bottom of the pot (a couple of inches) and you put down your seeder spuds, then cover them over with a couple more inches.  When they sprout you add more medium as they shoot up till the pot is full.  There are pots you can buy such as the 'tater pot' I used last year.


DIY tater box
Or you can make your own - I used a storage crate with some landscaping fabric in it. Last year I had good luck with this, so I spent the year making sure that when they went on sale I had a few dollars in my pocket to pick some up. Problem is, they're just too damn useful.  I have probably 20 of these now, but they're all in my workshop storing stuff.  Probably a good thing I guess as jumping in at the deep end with with such a massive amount would probably be a bit much to handle.  I have set up 3 this year.


The medium I'll be using is pretty much the same as last year.  4 big handfuls of coconut coir to one big handful of worm castings.  I'll be using this across the board on my containers - so they all have the same soil, sun, and seeds. This year I'm using Kennebec potatoes.  I hope to let them all grow out and do an objective comparison at the end between the 12 dollar tater pot and my 2.50 storage crate.


 I've put similar sized seeds in both the tater pot and one crate, both have 3  - the last one I put 4 in because that one is 'mine' to grow as I please.  Next they are covered up with a couple of inches of coir and will be kept well watered. Not too wet or they'll rot.
One good thing about growing in containers is that if you get rot in one container, you can try and save what you can, but it's not going to spread to another container. So there is a chance to contain your problems easily.


My last post on potatoes covers pretty much all the info on this, so follow the link at the top. No need for me to type everything out again.

Method 2. The Tower

  I've done this method before, before I moved to this house. Unfortunately we had to move (happily to this house) before the potatoes had a chance to grow out entirely.

The idea here is that you build a box (a few feet square) and you add dirt as the plants grow (nothing unusual) - as the plants reach the top you add boards, increasing the height of the structure - up to around 3 - 4 feet hight. When grown out you remove the boards and sort your potatoes.

 When I did it, I got a few spuds out of it, and the roots looked like they would have put out quite a few more had I been able to let it run to completion. So, why aren't I doing it here?
Well there are a couple of things about this method - number 1 being you have to come up with a LOT of soil, and given that you really shouldn't grow potatoes in the same soil for more than 2 years running, you have to not only find a use for all the soil used, but also replace it all.  For me it didn't seem that economic.

Still the idea is sound, so It got me thinking on how I could use this method, only on a smaller scale.

With all the offcuts I have from various garden beds, the sandbox, and other things - I have plenty of small lumber laying around. A lot of it longer than a foot.
Grabbing some and heading to the workshop I made up a small foot square box that I'll be using over a square in my garden bed - think of it like an 'extender' to let me take that small part of the bed higher than 6 inches.
I have a template made so every square I build will have the same dimensions - making them easy to stack up.


We put the seeds down (we'll go with 2) and cover them over. Our 6 inch bed means they can have around 3 inches below them and a couple of inches above them - pretty much the same as if we put them in a container - or used the bigger tower method.


We put the frame over top, and we can fill it with our grow medium when the plants poke out - as they grow up, another can be added - as high as I feel it's worth going (probably not terribly high).
The soil in this when the potatoes are done can be used in the rest of the bed, so it's not going to waste.  I can also take advantage of companion planting, as they are sharing the same soil to some extent.  We'll see how this goes.


Method 3. Grannies Ditch and Straw Method.

This final method comes from the Matriarch of my Wife's family.  Between her and her husband they share a near 2 centuries of gardening and agriculture knowledge and history.  There's nothing new to this , it's just 'the ditch method', but with a couple of things that I personally wouldn't have thought of.

This is as basic as it gets - no boxes, frames, landscaping fabric, string.. not even any mixing of coconut coir or other things.

You dig a ditch, as long as you want.  You put down your seeds 'with about a hands distance between them' - now there are hands and there are hands, and I'm pretty sure that at some point folks doing this would have said 'cubits' or something.  So I'm laying down 4 seeds and testing the water. Next is the incredibly simple, part:

Pine straw (or pine needles if you like). Cover them in pine straw.
Everything else is exactly the same - plants sprout, pile up pine straw around them.
I have a bunch of breaking down pine straw that was left over from some landscaping and won't be used for much else - people like fresh nice brown pine straw for mulch - so it's a perfect use.  It's so simple, and free, and fills all the requirements for spuds - loose, well drained, and as it breaks down (and it does break down really well) will add that slightly acidic soil that spuds need to grow well... it's also loose enough that you can put your hand in it to check for new spuds without disturbing the others... and did I mention, it's free if you have a rake and some pine trees growing near you?

When the spuds are done and the needles break down - I don't need to do anything with it. I could just plant something else.. done deal.

5 dollar Garden Spuds


 Now all this is well and good if you have space to dig a ditch, or money to throw on moss or coir, and compost/worm castings available, have some spare landscaping cloth. But how to do it on the cheap?
Well I figured that the crate cost me 2.50, which makes it a great start point for a 5 dollar garden project.
Assuming we have a 'have nothing' start point, we need to keep the medium in the crate in a way that allows drainage... so.. a few sheets of newspaper should do the trick. I wet them down to make them sit easier.

Last year I got some seeds for 2 dollars. This year I wasn't so lucky.. BUT I had been planning to use some spuds I sprouted myself and had kept in the fridge... not all of them survived the wait, but I did have 4 pretty good candidates - these are just plain old potatoes I had bought and and a couple that were left had sprouted. I put them away to see if we could grow them... so cost for me: nothing. I would have thrown them out.  We've put them down on a bed of broken down pine straw.. I had this piled off on one side of the driveway doing nothing, but if I didn't have it on hand, it was just a 20ft walk for me to get some from the park across the road. I realize there are SOME climates that may not have pine trees, but for most people it's very accessible.  If you don't have it, you could try and use crushed leaves, I dunno - might work.

we top it up with pine straw, this will flatten down with watering and break down - and we will pile it up to the top as the plants grow and see how it turns out - now this is something I would REALLY suggest doing outdoors. I've not tried growing spuds inside, and to be honest it's not likely something I'm going to try. It might be all well and good and work out great - but if one of those spuds starts to rot, you'll soon know about it.


 So there we have it, spuds all out and ready, done 3 different ways and ready to see which method gives me the best results!


Cheers!


Monday, April 28, 2014

Garden Update - Spring Garden FINALLY (nearly) planted!

No harvest this week - some ripping up (as you saw last post), a bunch of furious transplanting, and the final re-plant for spring. After this 'it is what it is' as it will be getting to hot to directly rely on seedlings making it directly sown, and we'll have to germinate at the 'station' or indoors then transplant.

So I guess we'll walk around and see what we see.

The field of beans! Last I left it I realized what I thought was fortuitous - in that the large pack of seeds I bought was EXACTLY how many I needed, only to find out that I'd forgotten to plant out several squares.  I got another pack of seeds and as we can see it's looking pretty full. They are planted 9 to a square, which is pretty dead on for bush beans. The 'yellowy look' of some of the plants is just due to them being a different variety.  I found last year that they'll grow to a decent height and produce a good number of beans packed in this close, and if you keep up with your fertilizing they'll keep on producing.  The thing to remember is to keep picking them as the beans get ripe. Once they harden on the vine, it's goodnight for the plant.  They'll slow down and eventually die.  Keep picking and keep em fed and you can get a fairly good productive run over a the spring.  These are what I refer to as a 'fast plant'.  Plant in Spring, pick in Spring, and out of the way by Summer.
Beans, being a legume, will actually add nitrogen to this new garden bed - so hopefully when Summer hits it will be chock full of goodness for whatever I decide to plant here.  As it turns out, this is also the bed that gets the most sun in a day - so when it comes time to replant I should be looking at things that bear a fruit of some kind over a leafy plant (which does better in partial shade - less drying of the leaves and wilting means better quality greens).

As doge would say 'Such space, much plantings, wow!' - you get an idea of how big those Sprouts were.  No time was wasted here.  You can make out the baby Kale in the corner sprouting up to replace what has gone.  The far plant is flowering and you can make out yellow tips at the top of the picture. I could have harvested these today, and I probably will very soon. But for now those yellow flowers will start attracting bees, and I want those bees established by the time the beans start to flower.  I REALLY need to start up a front flower garden - the yard as a whole and all that jazz - attract those pollinators!
The Sprouts are gone, the soil refilled and amended with coir and worm castings. From my germination station on the steps I transplanted lettuce from largest downwards.  These 12 should grow out well, the last space on the end I'm saving for a special experiment. I hope to be prepped for it by the weekend, but nature doesn't hold it's schedule for mine, and I'm racing against my own schedule and time.
Next up - beans, just because. No reason. I like Beans.  Where the sprouts were shading out I had planted Beets - Beets this year are like my lettuce last year - just no luck it seems. So I've replanted what was needed to fill out that row. At 9 per square that's 27 - but this late and having them all come up is optimistic - I get what I get.  Last in the bed - nearly too tiny to be seen, are Cabbage. I grew them last year 4 to a square in a different part of the garden just to see if they'd grow well here.  I got small cabbages due to crowding, and they could have done with more sun if you ask me, so 4 planted up at 1 to a square.  We like cabbage here, but we don't eat a lot - I'm hoping for coleslaw in the Summer.

Peas are up and reaching for my trellis. Some are too far forward - but that's ok, I have a garden project coming up where I'm going to prototype something that I hope will be a much easier and useful way to deal with climbing plants.  I'm currently in the design and acquisition phase - I like using reclaimed lumber when I can get it.
Up front are Carrots. I thought I had more, but hadn't done as good a job thinning them as I could have.  Replants have been done to bring this to 9 per square.  Last year I did 16, and had fairly good luck,  so this is more or less to just 'dial in the number' and compare quality.  They can be fiddly to grow,  but I've managed them in the ground, in containers, with very few problems.  Some things to remember is that they are root plants - so transplanting them doesn't work so well... they are fairly fragile when they sprout, so don't thin them out too soon. When they do get bigger (about this size) thin them RUTHLESSLY. you want just one carrot in each spot.  Everyone you have past that will drastically reduce your chances of getting a good sized carrot.  When they get to this size they seem to be fairly robust and aren't hard to take care of.   Fertilizing and water; I've found that when they are really small a good mist down with my worm tea helped them out a lot - but once they get bigger stop.  Carrots are roots, not leaves.  The same with water - the less you water them, the longer that root will grow to find water, and that means (thank you Captain Obvious) a bigger carrot.  Finally - and one that I really need to follow my own advice on here, soil.  You want a nice fluffy soil with good drainage - obviously so that water goes DOWN, but also so the carrot itself can grow easier.  This soil is about as fluffy as a brick.  I amended it and turned it, but those heavy rains from earlier always harden out the soil here. I'll carefully break it up around the plants when they are sprouted and healthy.
One final thing I did was plant carrots around the peas. This Year I'm looking more into companion planting. I've dabbled in the past, but this year I've been trying to put it more into practice.

A good friend bought me this book for Xmas, and it's a pretty good source of info. It's more a 'look up what you want' kind of reference than a 'read this entire thing and try and remember it all' book.. If you're interested in planting things together to increase your yields or to cut down on pests, there are worse places to start. It also has good info on how to rotate crops and other tidbits.

Around from the Peas we have that 'tucked away' corner bed that doesn't see that much action. It's fiddly and is the first to see the afternoon shade, as well as getting it's share of rainfall off the roof. If it wasn't set out when I moved here I wouldn't have used it at all... This year though it's doing ok, so maybe just the right combo of plants to make it useful. With the water and shade issues I've put in all leafy greens and things I just want to tinker with.
Collards that self planted are up the back, and Swiss Chard in front of it. Cucumbers I'm playing with to see how they go have sprouted at the far end, and I'll be watching them to see how they need to be thinned - I don't expect much from them, so we'll see. Up front is Cauliflower. I had goodish luck with broccoli there last year - but couldn't get the knack of the harvest. So this year I'm doing something a little different.

What a barren wasteland!  Well not really - if you look close at the foreground there are Eggplant sprouted and starting to do well.  Last year I tried growing Eggplant in a container and it sort of stopped, so I transplanted 2 here and they did really well. This year I planted 6 directly, but they seem to be starting out slowly. I also sprouted 2 in containers at the germination station on the steps, and low and behold they sprouted and grew faster. They're staying there in case i need backups - but from this I've learned that for Eggplant, start in a small pot and then transplant.  The other 6 squares are planted with Sweet Peppers. They'll take a while to germinate - and that always makes me anxious, so I've hedged my bets. I have 6 in the ground, 6 in a self watering pot, and 6 inside with me in one of those 'jiffy greenhouses'. Normally I prefer to sprout outside because you don't have to deal with hardening plants off when you move them, but in this case I'm trying to find the best way to deal with peppers.  So far nothing has come up in any of them.

The station.  This is where I sprout things that need transplanting in, and when I thin plants I transplant them out to here.  I don't like waste, and especially don't like wasting time.  When I thin plants down I try and be gentle and do 'transplant thinning' - I'll take the extra plants to these self watering window planters and put them in here. You water these from the bottom and capillary action draws the water up through the soil - so it's always nice and moist (provided you keep watering them....) It makes for a great transplant environment for most plants. Then later if one of the plants die out, I usually have a spare or two that can be transplanted back into the garden.
I also use these for sprouting lettuce.  The last 2 contained the 12 plants I just put in, so they've been replanted with Grand Rapids and Salad Bowl varieties.  I'm still trying to track down 'that perfect lettuce' for Summer burgers and sandwiches.  Other pots in the background (the square ones) are planted out with Eggplant, and another with Oregano. Oregano and Rosemary are the 2 herbs I really enjoy using but can't seem to get growing, so I'm trying extra hard this year.. usually once I do it once I have very little problem repeating it - but these two elude me still.
My teacup rose, still growing well. What do I use it for? It smells pretty and makes my wife happy. It's also the last surviving rose from our old rental house.
Circular pots along the back are Tomatoes.
... and they carry on down the steps. Last year we had Queen of Hearts tomatoes, and although they were a vine plant, by keeping them in smaller planters they only grew as high as a bush variety.  By keeping them pruned and rootbound we had a very nice solution for growing toms here.  This year I'm trying a Beefsteak variety my mother suggested.  So I have to keep her informed of how well it does. She lives in Sydney Australia, so as I'm done here with mine, she can put that info to immediate use (our seasons are reversed).  Last year I did 4 and did well - this year I'm upping it to 8. All of them are sprouted and several are on their way to good growth.  In the foreground is the salvaged blueberry from the farm.  With the shock of being saved and replanted here it's skipped it's budding - but that's ok as they usually need 2 plants to cross pollinate anyways. By the end of the spring I should have found another to go with it, and start my 'edible hedge' to separate the garden from the rest of the yard.

Despite the best efforts of 'Littlefoot', I have my quota for squash.  I was shooting for 6 plants in this 12ish foot long area, and just the other day the last one peeked up through.  I wanted 2 yellow squash, 2 zucchini and 2 butternut squash, but in the washouts, stompings, replanting and transplanting I can only be sure that the last 2 are the butternut. I lost track of which were which at the top so I could get anything.  Also around here I planted radishes, as they should (if left to grow and bolt to seed) help repel squash bugs and other nasties... I'm interested to see how this goes - also a suggestion is to use cigarette ash around the seed when it's planted (??!!) - I haven't tried this - but I might and keep folks informed.

Ahh the wilds.. The herb garden. You can see where Basil is coming up of its own accord - more than enough to replace the plants of last year.  Up the back is still bare as I'm hoping to transplant oregano there when (if) it sprouts, also coriander (cilantro) should go there, but I've misplaced my seeds - and Dill. Dill is seriously wishful thinking on my part to use to make pickles should I actually get anything out of my cucumbers.
The chives and sage are in bloom, and it won't be long till they go to seed. Before that I'm going to take as much of the sage as I can to dry and cure, and after that the Thyme that is growing under it will be split in half and moved, hopefully doubling what I have eventually.  I like the wild look of this, and I'm thinking of letting this run it's course as an experiment in permaculture.  I will maintain the needs of the soil and weed out undesirables, but the actual herb plants can grow, seed, die, and regrow as they see fit.

I think that would be interesting. I can tell all the plants apart instantly, so really it isn't a problem with them not being organized - and lets face it, wouldn't it be really nice to have herbs on demand without having to do anything to keep them going?  Talk about lazy gardening!

I'm going to be very busy over the next couple of weeks, but I am working on a few upcoming projects. If I'm not too late I'll be revisiting potatoes (as I said I would last year) with a head to head fair comparison of 3 different methods, as well as 'home built' vs. 'store bought'.  And within the next week I'll be starting a semi-regular article here with it's own tag '5 dollar garden'. Where I return to my 'ghetto fabulous' roots and show people how to start, maintain, grown and improve a garden spending no more than 5 dollars per article, to show how little you need if you want to get started growing your own veg.

Cheers!

Monday, March 31, 2014

Building a 4x4 Raised Garden Bed

Added another 4x4 garden bed, and figured that since people ask me about it I should document it and pop it up here.

 WARNING: This is a walk through for beginners, so don't pester me with 'Captain Obvious'. I'm preempting questions based on my own mess ups, and hoping others don't do the same.

This is nothing special - it's just a 4x4 garden bed as outlined in a zillion and one square foot garden blogs, articles and books.  But for what it's worth, I hope this answers questions helps with a lack of info that can bite you in the arse if you do it for yourself.

The big question people ask is 'cost' and the answer is 'depends' - depends on tools you have and want to use, depends on availablility of your lumber, depends on what you fill it with, and filling is the thing you should keep in mind. This particular one, with some careful shopping, cost me under 50 bucks to put together. Your mileage will probably vary.

Supplies:


 You're going to need some lumber, people are going to say 'use this, don't use that, only get this' but the truth is : use what you can get your hands on.  This is going in the backyard so there's no point spending more than you have to.


The Walls

My last bed was made from my previous garden beds so it cost me nothing - you could use reclaimed wood or whatever.. the only thing you need is 6 inches of width - because your garden bed is 6 inches high.  Now when I say 'need' I mean it as 'you won't outgrow this garden bed later' - you could grow just about anything in it. You could use 2x4's and grown only plants with shallow roots, but sooner or later you'll wish you didn't.. so if you can - go 6 inch timber.

Now I bought mine this time - as I'm running behind schedule and didn't have the time to scrounge, also this exterior lumber was on special (there is a reason - and I'll show you a little later..) I paid $3 each for these 2x6x10's.  When you buy timber you have to be aware of a few things... a 2x4 or a 2x6 in this case isn't 2 inches wide. and an 8ft long board may not be 8ft long, and even if it is, you can't cut it into two 4 ft lengths anyways.
If you're new to tools and wood, this can bite you in the ass constantly.. you have to be almost paranoid. Stay Alert, Trust No One, Keep Tape Measure Handy!
On our 2 inches wide we don't have to worry - because that's not really important here - our depth of 6 inches - if it's a bit high or a bit low it's not going to make that big a deal either.. BUT that length.. you're paying for that length, and a mistake can be costly. I bought two 10 foot long boards, and here's the reason:

The actual dimensions on the ground (4x4) of the finished bed are pretty important - not 'millimeter accuracy' important - but if each square is 'a foot' - it shouldn't be out by a 1/4 inch, and it should be square - not cabinet maker square - but it's a 'square foot garden' not a 'rhombus foot garden'.
If I buy an 8 foot board, measure 4 feet down, and cut... I'm going to be left with whatever length they gave me (not guarranteed at 8 foot anyways) MINUS the width of my saw blade cut... that can be an 8th of an inch... so that will throw you out by a quarter inch on 2 boards, which depending how you line that up... well.. good luck being square. Rectangle at best.
Not only that, but you're going to have a 4 x 4 bed measured from the OUTSIDE.. so when you divide it up - your rhombus looking thing is going to be too small..

If you're thinking 'holy crap this shit is complex' - no.. it's DEAD SIMPLE.. I'm just showing how a little extra knowledge from a guy who MADE THAT MISTAKE can save you a lot of cursing.

A couple of extra bucks gets you the 10ft long board, and you'll have a little offcut (under a foot), you'll learn an easy trick to making sure all the sides work, and you'll be happier in general..  If you're scrounging wood - look for that extra 2 feet as well.  You'll be doubly happy coz you also screwed it to 'the man'.

The Dividers

 Ok, you also have some lattice there. it's just thin wood strips - again I got it on a 'get this crap outta here' special in a bundle of 10 strips - I only need 6, so I got to pick the 'best' ones.  If you have a table saw you can cut this down from a 2x4 yourself, pick up that cheap ass 2.50 bit of stud lumber and have at it.  You might need 2 (I did) if you run into knots or mess up a cut. I got mine for 6.00 - so I paid 1 buck extra, saved me some work and headaches - the special was worth it for me.

The Bottom

 Some say this is optional - I say this is needed.  You've gone to the trouble of making this thing, so lets finish strong and do it right.  I put a 'bottom' in my beds of landscaping fabric.  This will stop a lot of weeds and grass growing up from the bottom. 2 of the 'dug down' beds close to the house don't have it, and I STILL weed them and yank grass strands growing out of them a year later.  So go the extra mile and do it. You'll thank yourself, or curse yourself for ignoring this.
Also, this is one of those times where paying that little extra can help you out.

 This is what I use. It's a sturdy fabric material that lasts - it's on the side of my compost frame and still holds despite how thin it looks. I've used cheaper plastic products and been very dissapointed. This stuff cost me 10 bucks a roll. There's PLENTY, and if you use it like me - it won't be a wasted investment.  You'll be seeing me lay this down on a few projects coming up later in the week (if I get time and don't have to race off to the farm).


The Tools

Again, this is what I'm using at this point. This isn't a 'need to have list' - as I also do a bit of carpentry, I have a couple of things that I'll use coz I can.

A saw and a screwdriver.  I've got power tools, so I'll use em. I could just as easily (and have in the past) used a regular old screwdriver, a hand drill, and a saw.
It takes a little time, and you sweat a little, but the results are the same.
It's like getting off the bus after a trip from Brisbane to Sydney:

'Smoke em if you got em'.


A measuring tape and a straight edge.  Again - something to measure with, something to draw a straight line. Nothing fancy - I use a framers square because I have one and it's easy.

If you don't have one, I'd recommend buying one just because they're so damn useful for a lot of things. You can get them in plastic, mines cast in 'injure your goddamn toe if you drop it' steel.  On the upside, it won't break.


Also a  stapler and a hammer.... HANG ON THAT'S NOT A HAMMER!  No.. it's not. It's living proof that my father-in-law secretly wishes I'd kill myself.
Knowing the story of the accident I had with one of these in my twenties (not going to go into details - but I refer to it as 'the stigmata incident' - you can pretty much guess) he buys me a spanking new one the next Xmas.
Seriously though- he's a great guy who's had ample opportunity to do me in - in much more humorous ways if he wanted :P  Seeing how I also had staples for this, I though I'd use it for that too.


LETS BUILD!

Measure twice - cut once.
Ok - lets Captain Obvious it for a moment, and we'll get onto that 'simple trick' that's gonna make this easy.  SO.. a 4ft x 4ft box, so we measure 4ft - duh...
As we said before, that's gonna leave you with 4 4ft bits of wood that wont have a 4ft interior, and if you put them together, with 2 as sides and 2 as ends, you're also gonna have about a 3 inch difference between width and length. Why? well a 2x6 is 1 1/2 inches wide - you put that on the ENDS of 4ft, and you have just added 3 inches in one dimension..
I just saved you 2 hours of frustration - you're welcome.


LITERALLY Measure twice!
Now, if you take your 4ft line and ADD the width of a board (1 1/2 inches round abouts - or better still, lay that other board across it and get an actual thickness...) we can do a little trick that will make sure it's all square and a nice 4 ft inside.

Ok this is the cut line.. We're going to cut this first board then use it as a ledger to make all the others... make sure you use THIS board though - why? because we all have a tendency to cut on one side of a line or the other - if we do it from 'the last board we cut' all mistakes will multiply - this way we can only 'screw it up'.


All the boards are cut
So with all the boards cut equal, we put it together.. You might be thinking 'hang on.. you said earlier about all them being the same size....'. Yep I did.. but we're gonna put them together so they're all nice and square.


Lets put em together
Ok this gets a little weird to explain, but in actually doing is very straight forward. This pic is your 'guide' every corner should look like this. Every board should have a 'toe in' that is to say it will have one corner at the end with a board attached to its side, and the other end will attach to the NEXT boards side. so there are no 'two sides and two ends'.

Use 3 inch construction screws or 3 inch deck screws - couple bucks for more than you'll need for this project at WalMart or any department store.  I found Lowes to be rather pricey in this dept.


A picture is worth a thousand words
Zoom in on that and what I'm rambling about becomes apparent instantly. It will be pretty close to square, and it's interior will measure 4ft on the money.  No fancy math, no fancy thinking - add the width of one board and be careful how you screw (a lesson you can apply to all aspects of your life).

 If it doesn't line up exact, it's not perfectly square, the corners aren't perfect - don't sweat it. Mike Holmes isn't going to appear behind you and stare you down with that 'Son, I am dissapoint' look.  It's meant to hold in dirt and keep out weeds, nothing more and nothing less.

Lets look at mine - it's warped out to high heaven, and you know why? Because cheap wood is cheap for a reason. This wood has a twist so bad that if I spun that plank around the center I could have launched a Sopwith Camel.  Nothing short of 4 hours with a jointing plane and making all the sides 1/2 inch thinner would have fixed this. But it's ok, and to tell the truth I hardly noticed it once the thing was in place and filled.

If this were a bit of furniture or a cabinet I was working on  - I'd have my wife pounding on the toilet door saying 'you've been in there 4 hours and all I hear is sobbing...' but it's not.. it's a garden bed - don't sweat it.


Onto the bottom. You're going to have to make 2 passes on this - it's no biggy. Roll out your landscape fabric, I leave an inch or so overlap on the sides so when I put it down it 'wraps up' making sure no grass can creep in at the join.  You line it up the top and take your nail gun, loaded with staples and......


 ... you realize the thing is too powerful and either blasts holes in the fabric or doesn't propel the staple no matter what you set the pressure to. So you go and get your stapler and use that - because it's the right tool for the job, and you're a bonehead.
Pop in a couple at the top, pull tight, pop in a couple at the bottom, then go around every 4 inches - pull tight, shoot a staple. Top , Bottom, and Side.  Repeat for the other side and the you'll find the 'loose flap' in the center pulls tight - and even if it doesn't, grass that grows through that is probably keeping good company with Kennedy's Magic Bullet during it's downtime.


Setting and Filling

Up till now we've used a handful of dollars to build a garden bed -  just like a lot of posts/blogs/youtubes/books say, it's pretty cheap!  But they don't tend to go on much about what can be the rather expensive part.. filling and using it.   How expensive can it be? Well if you decide to go with that super-great uber nutrient Miracle Wow Potting mix that's only 10 bucks for a 3ft bag... you're in for a bit of sticker shock.
See 4 x 4 = 16 square feet, and at 6 inches high, that's 8 cubic feet (coz 6 inches = half a foot), and that bag o wonder you saw for 10 bucks probably isn't measured in cubic feet, they mean a square foot measurement of some arbitrary depth.. might be 3 inches, might be a 1/4 inch sometimes they don't even say. Sometimes they have small print that tells you it's actually 0.25 of a cubic foot or just to totally screw with you, they also have it in liters (metric unit of volume).  So you buy bag after bag after bag and soon you paid 200 bucks for a garden bed... probably 4 months of your veg budget.

Some books and forums will tell you the only true way will be to use Dr This Man's amazing formula of 1/3 this, 1/3 that, and 1/3 the other - and all will be good - and if you've cottoned on to who I'm talking about, I'll follow this up with 'yes, it is good - though it can also be quite pricey'.

What I do is shop around. Often during the off season when I can and get stuff on special. What brand I get usually depends on 'what's cheapest'.

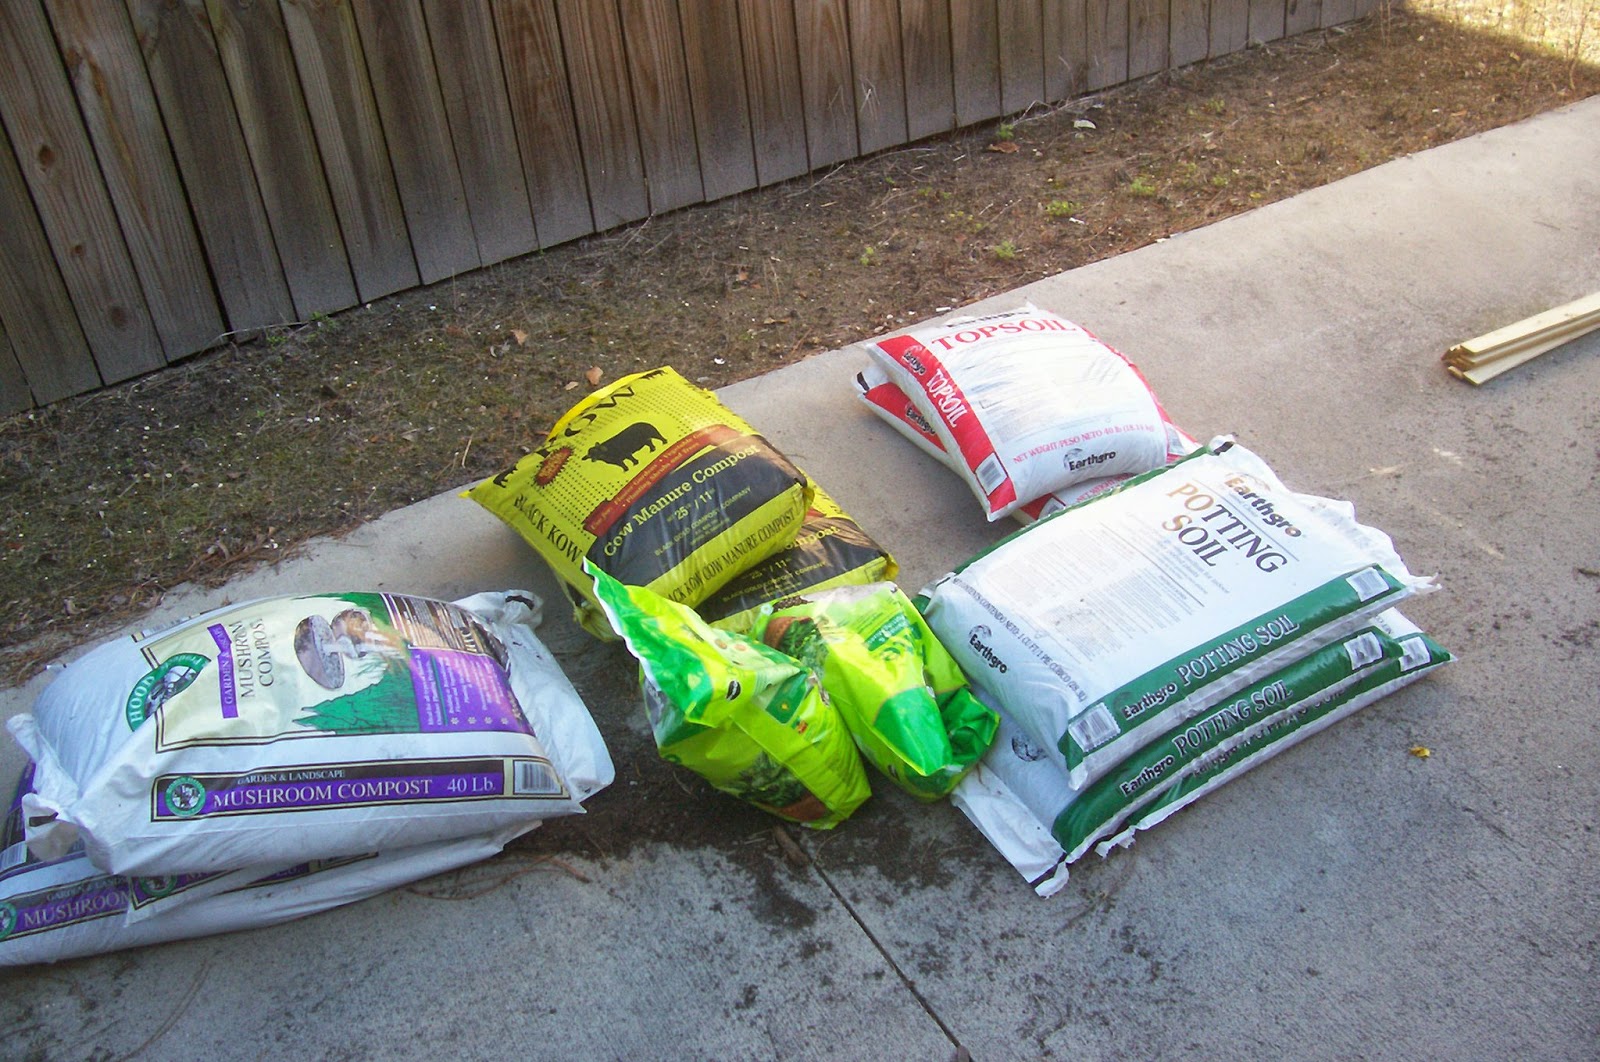
Here's my under 50 dollar list for this garden bed, and I didn't use it all - It was part of my '100 dollar buy for Spring' covered last post.

2 80lb bags of cheap topsoil (1.10 a bag)

3 bags Mushroom compost (around 2.50 a bag)

3 bags of 'Black Kow' cow compost - around the same.. it's important to note that when buying cow products to get the one that says COMPOST on it - I bought 'manure and humus' or something last year and it was 'glumpy' - and practically solidified the soil I used it in. Black Kow is a good brand that's pretty fluffy and nice.

2 Bags of Miracle Gro Perlite - yeah yeah I go on about Miracle Gro all the time and how I don't use it - but when they have a sale for 2 bucks a bag, I'm there.  Usually it's more pricey and I go for a cheaper brand. BTW I only used one for the bed, the other is for other projects.

4 bags of 'whatever is cheapest' potting soil. this one was 1.50 bucks a bag, and I only used 2.

Doing the math, it was around 30 bucks to fill this bed.

Look at that paragon of a shadow!
So, prep the area you're going to put the bed into - I sprayed with a weed killer I use at the farm, you could use roundup, or you could just take the grass up with a hoe - whatever. but you want to minimize the chance of weeds going up into your bed.  We go the extra distance and weeds can only vector in from the top - can't grow into or under. We do 1/3 the weeding that way - an ounce of prevention saves a huge pain in the arse.

Now mixing.. there's a popular method using a tarp where you pour it all in and lift corners, fold the left side in, fold it out, shake it all about.. but when you're dealing with 8 cubic feet of material you have to batch it out - and that means measuring stuff and doing a lot of work  - and I'd rather do the work where it matters.. so here is my very simple way of filling and mixing.

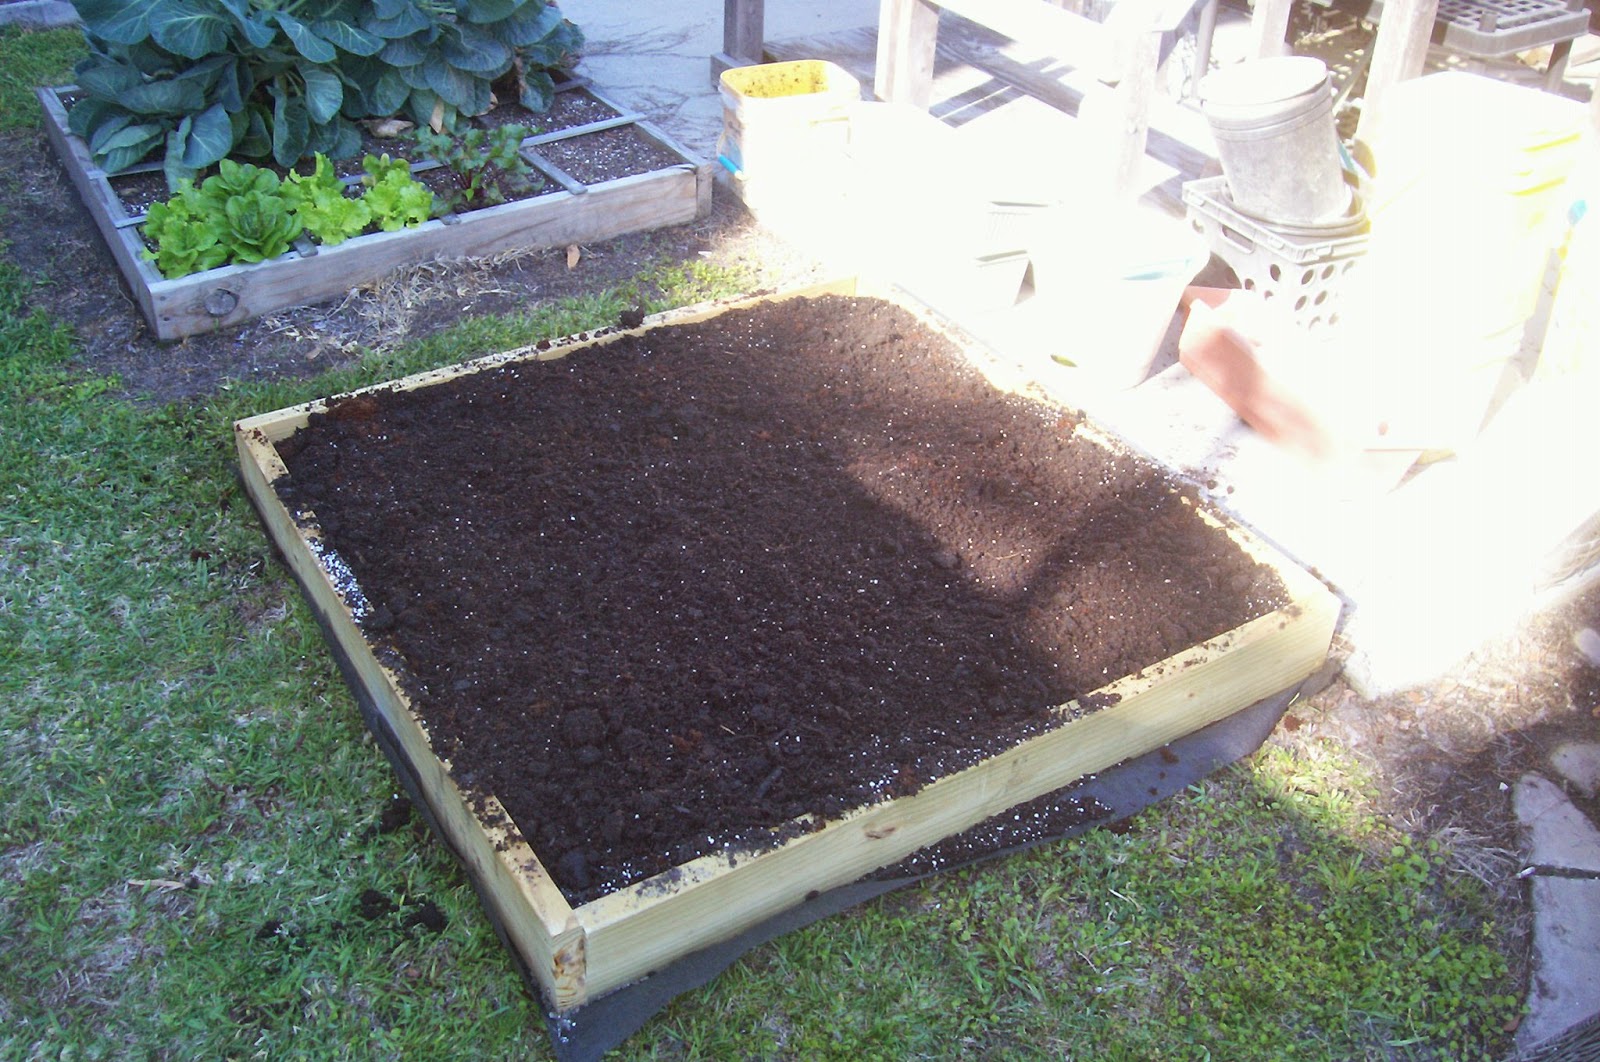
We put in the topsoil (above) - it's really just another 'protection layer' - its cheap and rather dense - and when we smooth it out with the backside of the soil rake it's only about 1/4 inch thick across the board.. it will compact down and stop stuff breaking through.

Next we add the mushroom compost and smooth that out - it's pretty light and this will be the first layer of 'proper soil' in our bed.


I had other pics, but my camera is playing up a little. We add the black kow, all the bags and mix a little as we smooth it. 2 blocks of coconut coir (after water and mix up of course) and a bag of perlite will 'break it up' a bit - lighten up the soil and add both drainage and some retention at the same time.  The coir will of course break down over time and add to the soil.
With each layer added we give a gentle mix and smoothdown with back of the soil rake.


The final layer is 2 bags of potting mix. I just smooth this out over the top - around abouts the top level of the frame - don't overfill! we have another step to go, and we will be adding by hand after that to fill this bed to capacity.

For now just level it across roughly. 1/4 inch under is fine in spots - we'll take care of that in a moment.


What About That Lattice Thingy?

HOLD ON you pushy bastards!  I'm getting to that!  Lay that tape measure down the a side and measure out 1 foot intervals - mark them and do the same for the other side - MAKE SURE YOU MEASURE FROM THE SAME EDGE!  It doesn't matter if you're a bit out - but try and be a bit out equally.
Lay down our lattice and pop a nail at the top, NOT THE BOTTOM. We will need to adjust it a little for the next step.


Do the same on the other side. Weave them under and over in a nice basket pattern.  This will not only look a little neater, but has a function as well - it will hold your lattice in place nice and snug. If some of it weathers or snaps, or a nail pops out, your nice grid for planting will remain intact for quite some time - and you can replace that slat at your leisure.

Next line up the other ends with our marks and pop nails in all the ends - snugging the whole thing down.


And Voila.
Cut off the overhang with whatever saw you want - handsaw, reciprocating saw, circular saw (what I use), anything that cuts.. cake knife if you want the bragging rights... but in the end it's done.  All over...

HUH? WHAT ABOUT THE SOIL?  What? All the soil is in layers and I didn't mix it? No. I didn't.. but here's the deal - I'm going to turn each square as I plant it out with a garden fork - the spikes on it are only 3 inches long so I'm not going to hit the fabric unless I dig like a dervish headed for China. Each square will be turned and planted every time I use it - so the soil 'layers' will be mixed from the get go.  Since we put it down in fairly even smooth layers, the soil consistency will be about the same for each square - and we didn't even need all those extra steps involved with a tarp.
At this point I'll also add a few handfuls of worm compost and if needed a handful or two of potting mix to bring each square up to level.


A FINAL NOTE:  Now this is simply 'A way' - not, as others may say 'THE way' - it has worked for me and I've used it for a couple of years now with no problems. In the end, soil is a medium and an environment unto itself - this is just the starting block of building good garden soil. As it's used it will be amended, changed, and improved over time.  If you have an idea of your own, TRY IT. Experiment and have fun.   Just remember that fun can be on a budget - you don't have to spend a hundred dollars to make a SINGLE garden bed - you can do it in under 50 and have results just as good (if not better).  There is only so much in gardening that you can throw money at, in the end knowledge and imagination trumps dollars.

Cheers, and happy planting!