Pages

Monday, April 7, 2014

Squash Patch


 Last year during spring I planted squash in pots as an experiment. I started gardening with an apartment container garden, and I like to do that still, as container gardening lets you try things on the fly - planting things you might not normally without wasting garden space, as well as adjusting placing for best sun,shade, and rain.
Although various things led to a rot setting in on my squash plants - I did manage to find a decent spot for growing.
I said then that this year I'd put in a dedicated space for growing squash along side the driveway by the back gate.  At the end of Winter I knocked down all the weeds in the strip and kept it pretty clear, watched the rainwater to see where it ran, and prepared for Spring for another round of Man vs Squash.
The strip itself is pretty long - some 30ft long. But I don't want to put in a couple of days of getting the entire thing set up if it's going to be a bogus spot - and besides I have plans this year for the lower 10ft (seen in the top photo) - so I figured this year I'd 'test the grounds'.

I took about 8ft to prep and see where it led. That's more than enough room for 6 plants, and I can run a trellis up the fence to try and avoid rot if the conditions get too wet as they did last year. The plants would put squash out, but the second they hit the ground they would mold up and have to be removed. Eventually the conditions got so damp that it moved to the plants themselves.
I managed to salvage one late planted Butternut Squash, and really enjoyed it - so this year we'll take the lessons and try and expand a little.
A soil rake makes quick work of the newly emerging weeds and grass - this took around 5 mins.


 Hoe to loosen up the dirt, and shovel to clear it out. I dug about 6 inches down - and started to run into some gravel - I suspect this is probably gravel and crushed limestone from when the driveway was put in.
The dirt was dug out into a big plastic garbage can I use to haul leaves, weeds, and other stuff to the compost frame. Visible weeds as well as roots and other things were removed as well. I'm going to be putting this dirt back in with some other goodies - as replacing all this would be a bit of a waste - the dirt is dark and good - and plenty of earthworms are living in there. I also went over with a garden fork and removed things like nut-grass and other weeds that have little tuber like roots that spread all over.

The gravel gave me an idea - the previous owners had used jaggedy-arse lava rock in their landscaping - I hate it. I like to walk barefoot in my yard, and my kids pick up anything they can lay their hands on.  I am going to replace some edging with riverstones at some point - but this stuff has to go.  It is, however, a medium of choice in things like aquaponics due to its surface area - it's also used for drainage. I had a bucket full that I'd pulled up (and plenty more where that came from) that has been sitting around for 6 months - so I dug a 3 inch trench down the center and laid it down - it should help with drainage there, and if water wants to sit there it will be lower than the bed proper, allowing the moisture to wick back up. I want to run some experiments in the future with wicking properties, this is a good place to start.
Plastic edging was added to stop lawn and weeds running back into the bed - I had this left over from my pool project last year - so I figured I'd put it to good use.


 Landscaping fabric was added to stop weeds underneath that may still be around from having an easy time making it back up.  Also it will allow water to run back through the fence while leaving the dirt in the bed. A couple of landscaping staples help hold it in place while you ready your dirt.


The dirt was shovelled back in, adding 2 bricks of coconut coir, perlite, worm castings, and in what might turn out to be a not so great decision; A bag and  a half or Organic Manure I had left over from last year and won't be buying again.  As I said in my post on building a bed - look for the word COMPOSTED on the bag when buying it - when water hit this stuff last year it set up the soil like concrete.. ok not quite, but hard enough that seedlings couldn't bust through it.  In many squares where I put a bunch in, it was several months before it started to break down and mix in... anyways - this stuff had to go, and I figured this was as good a place as any to get rid of it.  In hindsight perhaps composting it would have been a better move... Live and learn.


As it is, it's not going to make that much difference, as Squash is planted in mounds. New potting mix was put down to hold the seeds, and each mound is made in an inch or so depression - by the time to root goes down to tap, it should be strong enough to burrow.  That's the idea anyways.  I spaced them out with some room - we have 2 yellow squash, 2 zucchini , and 2 butternut squash - as they pop up they'll be thinned back, a trellis will probably be added if needed (for the butternut squash it will be as it's a runner and climber), and we'll see about what grows well with them to utilize the space around them if possible.

We'll check and monitor these over this Spring and Summer - if the position is worthwhile I'll expand it down the driveway next year - if it isn't - well it can be planted out with flowers to try and attract pollinators.

As I'm writing this, we just had a big rain - I was going to make a post on fixing and planting out another part of the garden, but figured with the rain it would be more objective to see if my tweaks actually did any good... also it gives the newly planted seeds a chance to pop up, as there's nothing more boring than a post of blank earth with 'this is where I planted some stuff!'.


While I was out I cleared out the white storage racks I'd been using. They've served me well but were never meant for outdoor use - they were the cheapest thing I could find and have been used since 2008 - older than my kids!
I had some more robust ones sitting outside in my 'when I get around to it' pile at the end of the driveway.  Taking the opportunity I cleaned up and organized a bit.
I've been phasing out my cheapy pots from the first garden, and replacing them with spa pots over the last couple of years - I took the opportunity to get rid of some and pass them onto my Stepdaughters friend who is getting into gardening herself, but like me when I started, didn't have available pocketmoney to throw out there for the initial hardware... they should have a few more years worth of life left in them.

Hoping this rain clears and gives me a nice surprise to post about in a couple of days time!

Cheers!


Tuesday, April 1, 2014

Weeds n Seeds n Worms - roughhouse composting

A couple of posts ago I talked about the compost bin, mowing and weeding, and so the question asked is 'where do the weeds go?' Do I burn them? Thrown the out in the trash?

Nope, I throw them all in the compost bin.  Reading around I see there are folks that are really 'light handed' (for want of a better term) with composting and in particular worm composting. In normal compost they have ratios and don't put things in for want of damaging their end product - and I can see the sense in that... to a degree. For instance I wouldn't put pesticides in there or chemicals, nor would I put meat scraps in because of smell and flies.  But other than that it's all good. Probably the only thing out of the ordinary I won't include, and throw out in the trash, is tomato plants - there's enough empirical evidence for my liking to back up not wanting to pass on tomato based problems into the tub. I haven't personally proven or disproven it, but enough people who's opinions I respect treat it as 'common knowledge'.

Now, what you get out depends on what you put in - and making compost is in some ways like brewing beer.  I understand people wanting a specific 'fast brew' compost for the sole purpose of fast garden use. If you're one of those people, have at it - nothing wrong with this at all.  But if you want a multifunction compost solution, you can afford to be a bit rougher, and still have good results.

The reasoning of 'no weeds in the compost' sorta makes sense. That seeds might come out the other end of the process and go straight into your garden, planted, and make more work. But really lets look at it objectively:

I have a 4 x 4 frame for composting, it's constantly breaking down, and I'm constantly adding paper, grass, leaves, veg scraps, cardboard sheets and lawn scrap (weeds).

  • We have to assume that not all the weeds have gone to seed - this will be a varying percentage based on how slack you've been. Even assuming a high percentage, it's still a percentage. Not all the weeds will have seeds to begin with.
  • On the top it goes - the plants dry, seeds drop in. Now in your carefully balanced and cultivated garden, does EVERY seed you plant germinate? I have a pretty high germination rate in the garden proper - but not EVERY seed - so thrown into the composter? On top where all the stuff that has yet to break down into 'the gold' is?  No, we are dealing with a percentage of a percentage.
  • Birds, Squirrels, and other critters jump in my bin and peck, scratch, and burrow. Some of the seeds that drop will be eaten.
  • They get covered and rained on, and hosed down. Too much water and seeds can rot - so out go a few more.
  • Some may sprout (may, not in my tub, ever, but may!) only to be covered up by more stuff - blocking the sun like a kids blanket left on the lawn for a week.. they yellow and die before reaching maturity. More seeds off to meet the weed gods!
  • They slowly go down into the bin, as things break down around them heat increases. Heat that's trapped in by more stuff going on top, the sun beating down, moisture heats up to a point where it's no longer beneficial to the seed..and now it's waterlogged covering no longer protects it. More stuff on top, more pressure.. a LOT will break down, rot, or just be cooked to the point where they are useless.
  • Down down they go, things cool down a little as they get down to the bottom.. whatever few seeds are left now contend with earthworms and other little bugs.. all the while that relentless moisture breaks them down down down.
  • In the end the tiny tiny percentage that by some miracle survives the year long break down process to good compost.... they get put into the garden and take root. Well that's when the last line of defense kicks in - Me.. out on a Sunday on my 10 minute weekly weed of the garden. That ain't something I planted? Out it goes... Of all those potential weeds, if any make it back - they get a one way ticket back into the bin to see if they can pull a 'Houdini' the second time around.

It's not the weeds in the compost you have to watch out for, it's the weeds still in the yard.

'Roughhouse Composting' - Nature has been doing this process since the world began, without us babysitting it. Unless you're trying to brew a specialty fertilizer - you're worry and work is better spent elsewhere.

Another one you'll see with regularity is on the subject of Vermicomposting  - which we all know about because I never shut up about it.  'use only plain white unbleached paper' or 'use only distilled water' - I think they're missing a very important part in these statements, and that is they should start with I.

"I only use plain white unbleached paper". - and even then there is rarely an explanation.  For someone that is directly wanting fast processing to end up with a marketable professional product - this makes TOTAL sense, or for someone breeding the worms for product.   But this seems to go through the internet like Moses coming down the mountain and becomes 'THOU SHALT NOT'.

For several years now I've been busting down my junk mail and making good fertilizer without ever renewing my initial investment, or ever having a 'worm holocaust' incident of any kind. I've never had a mass escape/suicide - I've never had a noticeable decrease in population (only in output).

 I can tell you first hand that the amount of pre-sorting you do on what goes into a worm bin will directly affect your clean out.  But only in how much sorting of inedibles (plastic shreds and the like) are at the other end - I can tell you that thin paper will likely be eaten faster than bulky paper - and I can tell you that the ratio of green to brown waste in the tub will directly impact the speed at which the process takes. I can tell you that having too much stuff in a tub will compact it and may lead to a month of bad recovery....

But what I can't tell you is that glossy ink flyers, newsprint, or even the plastic lining over some packing boxes will harm your worms, or that water straight from the tap will ruin your worm bin...

Because that would be bullshit.

In my 'mission statement' posts when I started this blog I said I wouldn't do the 'garbage in and gospel out' of the internet and pass on info I couldn't confirm. But I feel obligated to also do that for misinformation.

But don't take my word for it, I'll show you. As I've documented here I clean out a tray a month minimum from my 2 little worm farms.

 This is yesterdays tray. A day early for April. Originally I was going post this as a 'wow check this out' but I figure it would suit this purpose much better. Underneath is the full tray for last month (March) - its a good display of what I'm putting in on a regular basis. The tray on top has gone through it's process - that is to say that by the time I get to harvesting it, from top to bottom has taken 4 months.  One tray a month, just about every month. It goes from that multi colored mess of junk mail and packaging to the uniform brown compost in the top tray.


Lets have a closer look. It's nearly entirely devoid of inedibles - anything that could be broken down was broken down. In fact in this tub the amount of waste that wasn't reclaimed to castings could fit into a shotglass - I did have a picture, but as I said, camera has been playing up lately. That's 20 odd pounds of start product that 'shouldn't be used' broken down into 10 odd pounds of fertilizer.


It just keeps on going...
The process doesn't stop at the tray though - this is from the bucket I store my castings in - a walmart 5 gallon bucket with sealed lid.  The second bucket I had to buy (as my first was filled over the winter.) with about 1/2 inch filled at the bottom. Looking closely you see worms in that too - even after you sort and separate worms and as much uneaten stuff as you can, cocoons hatch in there and even sealed, worms eat, rise to maturity and breed. Even when stored in a sealed container, they are still breaking down the trash.


For some reason this camera angle looks crazy - and doesn't do the volume justice. At the end of the cleanout today it went from a bit under 1/2 inch at the bottom to over 3/4 full. just doing an 'arm lift guess' it weighs around 30lbs.

One tray wasn't as clean as the first, but it was still very clean. What is in there will be broken down further and I'll pick out bits and pieces as I use it.  But as you can see - tap water and whatever I can fit through the shredder.. absolutely no ill effects.

There's no need to coddle your compost unless you want a specific result. If you're trying to multi-task it (as I am) such as reducing household waste as well as turning it into a usable product for yourself and friends - you really can't afford to.  Nature has been doing it since the start of time, and will be doing it long after we're gone (in fact, we're going to aid the process eventually). If you need specific answers to questions on the subject, the best place to start is by asking a professional (such as Uncle Jims Worm Farm) and getting the info first hand.

Now, if you're someone who is making high grade fertilizer, or raising worms, or doing something a certain way for a certain result - I am in no way denigrating what you do or trying to discredit it.  But for those that aren't - please check your information before passing it off as gospel. If you're putting yourself forward as some kind of information source then have some journalistic integrity. That others may look at what I write and use it as a learning tool, for me, is a deeply humbling thought  rather than an ego boost. I respect my readers too much put something out there that I haven't personally researched, and where possible tested myself.

Anyways - lets put this pile of poo to good use!

Onwards to planting!


Monday, March 31, 2014

Building a 4x4 Raised Garden Bed

Added another 4x4 garden bed, and figured that since people ask me about it I should document it and pop it up here.

 WARNING: This is a walk through for beginners, so don't pester me with 'Captain Obvious'. I'm preempting questions based on my own mess ups, and hoping others don't do the same.

This is nothing special - it's just a 4x4 garden bed as outlined in a zillion and one square foot garden blogs, articles and books.  But for what it's worth, I hope this answers questions helps with a lack of info that can bite you in the arse if you do it for yourself.

The big question people ask is 'cost' and the answer is 'depends' - depends on tools you have and want to use, depends on availablility of your lumber, depends on what you fill it with, and filling is the thing you should keep in mind. This particular one, with some careful shopping, cost me under 50 bucks to put together. Your mileage will probably vary.

Supplies:


 You're going to need some lumber, people are going to say 'use this, don't use that, only get this' but the truth is : use what you can get your hands on.  This is going in the backyard so there's no point spending more than you have to.


The Walls

My last bed was made from my previous garden beds so it cost me nothing - you could use reclaimed wood or whatever.. the only thing you need is 6 inches of width - because your garden bed is 6 inches high.  Now when I say 'need' I mean it as 'you won't outgrow this garden bed later' - you could grow just about anything in it. You could use 2x4's and grown only plants with shallow roots, but sooner or later you'll wish you didn't.. so if you can - go 6 inch timber.

Now I bought mine this time - as I'm running behind schedule and didn't have the time to scrounge, also this exterior lumber was on special (there is a reason - and I'll show you a little later..) I paid $3 each for these 2x6x10's.  When you buy timber you have to be aware of a few things... a 2x4 or a 2x6 in this case isn't 2 inches wide. and an 8ft long board may not be 8ft long, and even if it is, you can't cut it into two 4 ft lengths anyways.
If you're new to tools and wood, this can bite you in the ass constantly.. you have to be almost paranoid. Stay Alert, Trust No One, Keep Tape Measure Handy!
On our 2 inches wide we don't have to worry - because that's not really important here - our depth of 6 inches - if it's a bit high or a bit low it's not going to make that big a deal either.. BUT that length.. you're paying for that length, and a mistake can be costly. I bought two 10 foot long boards, and here's the reason:

The actual dimensions on the ground (4x4) of the finished bed are pretty important - not 'millimeter accuracy' important - but if each square is 'a foot' - it shouldn't be out by a 1/4 inch, and it should be square - not cabinet maker square - but it's a 'square foot garden' not a 'rhombus foot garden'.
If I buy an 8 foot board, measure 4 feet down, and cut... I'm going to be left with whatever length they gave me (not guarranteed at 8 foot anyways) MINUS the width of my saw blade cut... that can be an 8th of an inch... so that will throw you out by a quarter inch on 2 boards, which depending how you line that up... well.. good luck being square. Rectangle at best.
Not only that, but you're going to have a 4 x 4 bed measured from the OUTSIDE.. so when you divide it up - your rhombus looking thing is going to be too small..

If you're thinking 'holy crap this shit is complex' - no.. it's DEAD SIMPLE.. I'm just showing how a little extra knowledge from a guy who MADE THAT MISTAKE can save you a lot of cursing.

A couple of extra bucks gets you the 10ft long board, and you'll have a little offcut (under a foot), you'll learn an easy trick to making sure all the sides work, and you'll be happier in general..  If you're scrounging wood - look for that extra 2 feet as well.  You'll be doubly happy coz you also screwed it to 'the man'.

The Dividers

 Ok, you also have some lattice there. it's just thin wood strips - again I got it on a 'get this crap outta here' special in a bundle of 10 strips - I only need 6, so I got to pick the 'best' ones.  If you have a table saw you can cut this down from a 2x4 yourself, pick up that cheap ass 2.50 bit of stud lumber and have at it.  You might need 2 (I did) if you run into knots or mess up a cut. I got mine for 6.00 - so I paid 1 buck extra, saved me some work and headaches - the special was worth it for me.

The Bottom

 Some say this is optional - I say this is needed.  You've gone to the trouble of making this thing, so lets finish strong and do it right.  I put a 'bottom' in my beds of landscaping fabric.  This will stop a lot of weeds and grass growing up from the bottom. 2 of the 'dug down' beds close to the house don't have it, and I STILL weed them and yank grass strands growing out of them a year later.  So go the extra mile and do it. You'll thank yourself, or curse yourself for ignoring this.
Also, this is one of those times where paying that little extra can help you out.

 This is what I use. It's a sturdy fabric material that lasts - it's on the side of my compost frame and still holds despite how thin it looks. I've used cheaper plastic products and been very dissapointed. This stuff cost me 10 bucks a roll. There's PLENTY, and if you use it like me - it won't be a wasted investment.  You'll be seeing me lay this down on a few projects coming up later in the week (if I get time and don't have to race off to the farm).


The Tools

Again, this is what I'm using at this point. This isn't a 'need to have list' - as I also do a bit of carpentry, I have a couple of things that I'll use coz I can.

A saw and a screwdriver.  I've got power tools, so I'll use em. I could just as easily (and have in the past) used a regular old screwdriver, a hand drill, and a saw.
It takes a little time, and you sweat a little, but the results are the same.
It's like getting off the bus after a trip from Brisbane to Sydney:

'Smoke em if you got em'.


A measuring tape and a straight edge.  Again - something to measure with, something to draw a straight line. Nothing fancy - I use a framers square because I have one and it's easy.

If you don't have one, I'd recommend buying one just because they're so damn useful for a lot of things. You can get them in plastic, mines cast in 'injure your goddamn toe if you drop it' steel.  On the upside, it won't break.


Also a  stapler and a hammer.... HANG ON THAT'S NOT A HAMMER!  No.. it's not. It's living proof that my father-in-law secretly wishes I'd kill myself.
Knowing the story of the accident I had with one of these in my twenties (not going to go into details - but I refer to it as 'the stigmata incident' - you can pretty much guess) he buys me a spanking new one the next Xmas.
Seriously though- he's a great guy who's had ample opportunity to do me in - in much more humorous ways if he wanted :P  Seeing how I also had staples for this, I though I'd use it for that too.


LETS BUILD!

Measure twice - cut once.
Ok - lets Captain Obvious it for a moment, and we'll get onto that 'simple trick' that's gonna make this easy.  SO.. a 4ft x 4ft box, so we measure 4ft - duh...
As we said before, that's gonna leave you with 4 4ft bits of wood that wont have a 4ft interior, and if you put them together, with 2 as sides and 2 as ends, you're also gonna have about a 3 inch difference between width and length. Why? well a 2x6 is 1 1/2 inches wide - you put that on the ENDS of 4ft, and you have just added 3 inches in one dimension..
I just saved you 2 hours of frustration - you're welcome.


LITERALLY Measure twice!
Now, if you take your 4ft line and ADD the width of a board (1 1/2 inches round abouts - or better still, lay that other board across it and get an actual thickness...) we can do a little trick that will make sure it's all square and a nice 4 ft inside.

Ok this is the cut line.. We're going to cut this first board then use it as a ledger to make all the others... make sure you use THIS board though - why? because we all have a tendency to cut on one side of a line or the other - if we do it from 'the last board we cut' all mistakes will multiply - this way we can only 'screw it up'.


All the boards are cut
So with all the boards cut equal, we put it together.. You might be thinking 'hang on.. you said earlier about all them being the same size....'. Yep I did.. but we're gonna put them together so they're all nice and square.


Lets put em together
Ok this gets a little weird to explain, but in actually doing is very straight forward. This pic is your 'guide' every corner should look like this. Every board should have a 'toe in' that is to say it will have one corner at the end with a board attached to its side, and the other end will attach to the NEXT boards side. so there are no 'two sides and two ends'.

Use 3 inch construction screws or 3 inch deck screws - couple bucks for more than you'll need for this project at WalMart or any department store.  I found Lowes to be rather pricey in this dept.


A picture is worth a thousand words
Zoom in on that and what I'm rambling about becomes apparent instantly. It will be pretty close to square, and it's interior will measure 4ft on the money.  No fancy math, no fancy thinking - add the width of one board and be careful how you screw (a lesson you can apply to all aspects of your life).

 If it doesn't line up exact, it's not perfectly square, the corners aren't perfect - don't sweat it. Mike Holmes isn't going to appear behind you and stare you down with that 'Son, I am dissapoint' look.  It's meant to hold in dirt and keep out weeds, nothing more and nothing less.

Lets look at mine - it's warped out to high heaven, and you know why? Because cheap wood is cheap for a reason. This wood has a twist so bad that if I spun that plank around the center I could have launched a Sopwith Camel.  Nothing short of 4 hours with a jointing plane and making all the sides 1/2 inch thinner would have fixed this. But it's ok, and to tell the truth I hardly noticed it once the thing was in place and filled.

If this were a bit of furniture or a cabinet I was working on  - I'd have my wife pounding on the toilet door saying 'you've been in there 4 hours and all I hear is sobbing...' but it's not.. it's a garden bed - don't sweat it.


Onto the bottom. You're going to have to make 2 passes on this - it's no biggy. Roll out your landscape fabric, I leave an inch or so overlap on the sides so when I put it down it 'wraps up' making sure no grass can creep in at the join.  You line it up the top and take your nail gun, loaded with staples and......


 ... you realize the thing is too powerful and either blasts holes in the fabric or doesn't propel the staple no matter what you set the pressure to. So you go and get your stapler and use that - because it's the right tool for the job, and you're a bonehead.
Pop in a couple at the top, pull tight, pop in a couple at the bottom, then go around every 4 inches - pull tight, shoot a staple. Top , Bottom, and Side.  Repeat for the other side and the you'll find the 'loose flap' in the center pulls tight - and even if it doesn't, grass that grows through that is probably keeping good company with Kennedy's Magic Bullet during it's downtime.


Setting and Filling

Up till now we've used a handful of dollars to build a garden bed -  just like a lot of posts/blogs/youtubes/books say, it's pretty cheap!  But they don't tend to go on much about what can be the rather expensive part.. filling and using it.   How expensive can it be? Well if you decide to go with that super-great uber nutrient Miracle Wow Potting mix that's only 10 bucks for a 3ft bag... you're in for a bit of sticker shock.
See 4 x 4 = 16 square feet, and at 6 inches high, that's 8 cubic feet (coz 6 inches = half a foot), and that bag o wonder you saw for 10 bucks probably isn't measured in cubic feet, they mean a square foot measurement of some arbitrary depth.. might be 3 inches, might be a 1/4 inch sometimes they don't even say. Sometimes they have small print that tells you it's actually 0.25 of a cubic foot or just to totally screw with you, they also have it in liters (metric unit of volume).  So you buy bag after bag after bag and soon you paid 200 bucks for a garden bed... probably 4 months of your veg budget.

Some books and forums will tell you the only true way will be to use Dr This Man's amazing formula of 1/3 this, 1/3 that, and 1/3 the other - and all will be good - and if you've cottoned on to who I'm talking about, I'll follow this up with 'yes, it is good - though it can also be quite pricey'.

What I do is shop around. Often during the off season when I can and get stuff on special. What brand I get usually depends on 'what's cheapest'.

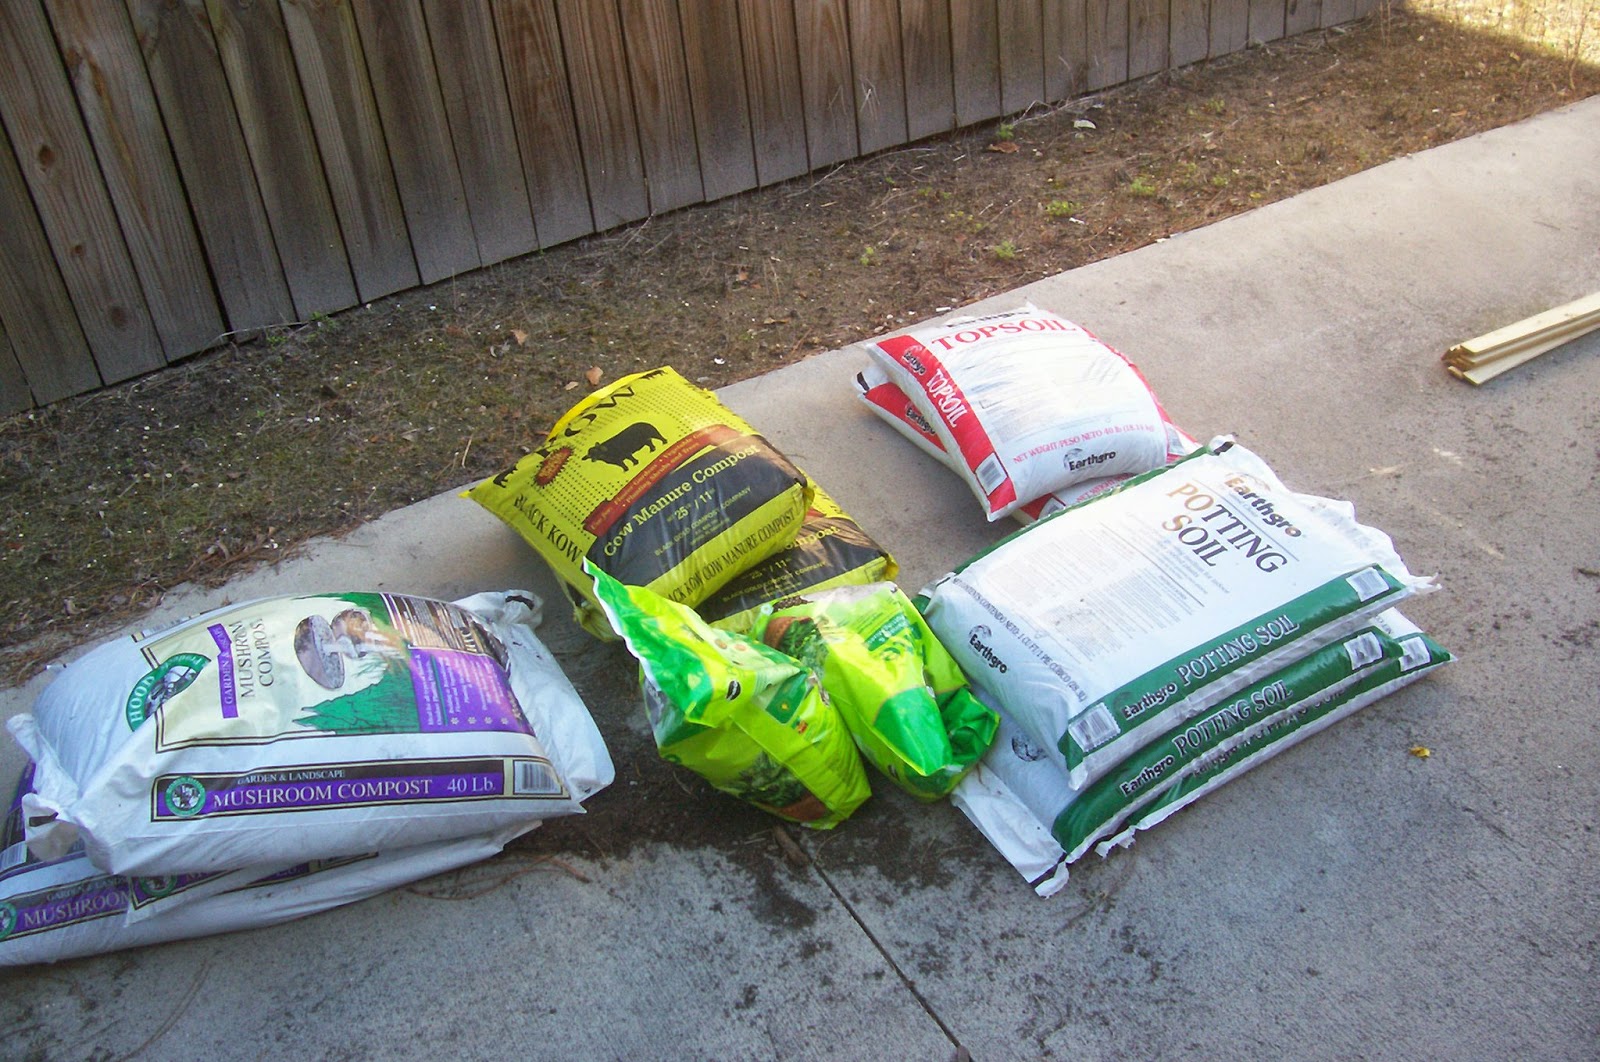
Here's my under 50 dollar list for this garden bed, and I didn't use it all - It was part of my '100 dollar buy for Spring' covered last post.

2 80lb bags of cheap topsoil (1.10 a bag)

3 bags Mushroom compost (around 2.50 a bag)

3 bags of 'Black Kow' cow compost - around the same.. it's important to note that when buying cow products to get the one that says COMPOST on it - I bought 'manure and humus' or something last year and it was 'glumpy' - and practically solidified the soil I used it in. Black Kow is a good brand that's pretty fluffy and nice.

2 Bags of Miracle Gro Perlite - yeah yeah I go on about Miracle Gro all the time and how I don't use it - but when they have a sale for 2 bucks a bag, I'm there.  Usually it's more pricey and I go for a cheaper brand. BTW I only used one for the bed, the other is for other projects.

4 bags of 'whatever is cheapest' potting soil. this one was 1.50 bucks a bag, and I only used 2.

Doing the math, it was around 30 bucks to fill this bed.

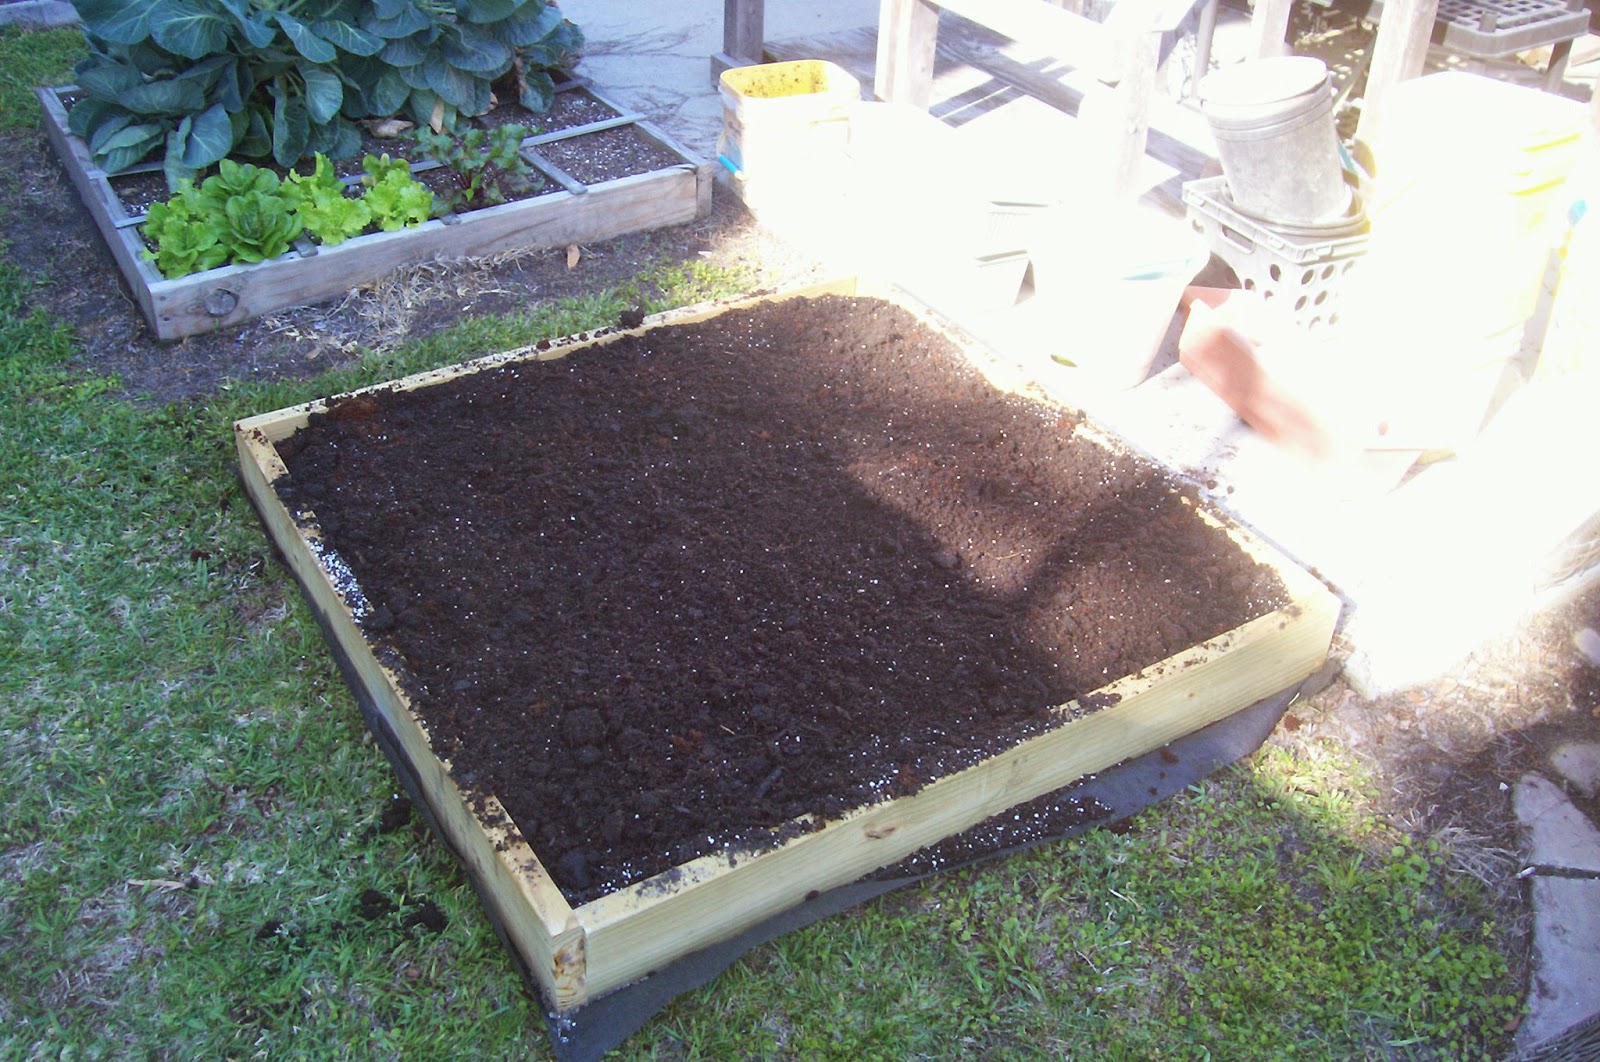
Look at that paragon of a shadow!
So, prep the area you're going to put the bed into - I sprayed with a weed killer I use at the farm, you could use roundup, or you could just take the grass up with a hoe - whatever. but you want to minimize the chance of weeds going up into your bed.  We go the extra distance and weeds can only vector in from the top - can't grow into or under. We do 1/3 the weeding that way - an ounce of prevention saves a huge pain in the arse.

Now mixing.. there's a popular method using a tarp where you pour it all in and lift corners, fold the left side in, fold it out, shake it all about.. but when you're dealing with 8 cubic feet of material you have to batch it out - and that means measuring stuff and doing a lot of work  - and I'd rather do the work where it matters.. so here is my very simple way of filling and mixing.

We put in the topsoil (above) - it's really just another 'protection layer' - its cheap and rather dense - and when we smooth it out with the backside of the soil rake it's only about 1/4 inch thick across the board.. it will compact down and stop stuff breaking through.

Next we add the mushroom compost and smooth that out - it's pretty light and this will be the first layer of 'proper soil' in our bed.


I had other pics, but my camera is playing up a little. We add the black kow, all the bags and mix a little as we smooth it. 2 blocks of coconut coir (after water and mix up of course) and a bag of perlite will 'break it up' a bit - lighten up the soil and add both drainage and some retention at the same time.  The coir will of course break down over time and add to the soil.
With each layer added we give a gentle mix and smoothdown with back of the soil rake.


The final layer is 2 bags of potting mix. I just smooth this out over the top - around abouts the top level of the frame - don't overfill! we have another step to go, and we will be adding by hand after that to fill this bed to capacity.

For now just level it across roughly. 1/4 inch under is fine in spots - we'll take care of that in a moment.


What About That Lattice Thingy?

HOLD ON you pushy bastards!  I'm getting to that!  Lay that tape measure down the a side and measure out 1 foot intervals - mark them and do the same for the other side - MAKE SURE YOU MEASURE FROM THE SAME EDGE!  It doesn't matter if you're a bit out - but try and be a bit out equally.
Lay down our lattice and pop a nail at the top, NOT THE BOTTOM. We will need to adjust it a little for the next step.


Do the same on the other side. Weave them under and over in a nice basket pattern.  This will not only look a little neater, but has a function as well - it will hold your lattice in place nice and snug. If some of it weathers or snaps, or a nail pops out, your nice grid for planting will remain intact for quite some time - and you can replace that slat at your leisure.

Next line up the other ends with our marks and pop nails in all the ends - snugging the whole thing down.


And Voila.
Cut off the overhang with whatever saw you want - handsaw, reciprocating saw, circular saw (what I use), anything that cuts.. cake knife if you want the bragging rights... but in the end it's done.  All over...

HUH? WHAT ABOUT THE SOIL?  What? All the soil is in layers and I didn't mix it? No. I didn't.. but here's the deal - I'm going to turn each square as I plant it out with a garden fork - the spikes on it are only 3 inches long so I'm not going to hit the fabric unless I dig like a dervish headed for China. Each square will be turned and planted every time I use it - so the soil 'layers' will be mixed from the get go.  Since we put it down in fairly even smooth layers, the soil consistency will be about the same for each square - and we didn't even need all those extra steps involved with a tarp.
At this point I'll also add a few handfuls of worm compost and if needed a handful or two of potting mix to bring each square up to level.


A FINAL NOTE:  Now this is simply 'A way' - not, as others may say 'THE way' - it has worked for me and I've used it for a couple of years now with no problems. In the end, soil is a medium and an environment unto itself - this is just the starting block of building good garden soil. As it's used it will be amended, changed, and improved over time.  If you have an idea of your own, TRY IT. Experiment and have fun.   Just remember that fun can be on a budget - you don't have to spend a hundred dollars to make a SINGLE garden bed - you can do it in under 50 and have results just as good (if not better).  There is only so much in gardening that you can throw money at, in the end knowledge and imagination trumps dollars.

Cheers, and happy planting!

State Of The Yard Address

Well it goes without saying that not much is done in the yard during Winter.. even down here in the deep South.  Sure there wasn't snow where I am (different story to the North in Atlanta) but that doesn't mean it's 'pleasant' to go outside by any degree.
Winter weeds had pushed up all over the season and of course the migration of the fire-ants. Nowhere near the numbers of the first year, but they migrate in from other yards that deal with them 'just enough', Grass was creeping up the sides of the sides of the garden beds - and run rampant in places I want to convert this year into new beds.
What's this got to do with the garden?  Well to me - just about everything, and in your circumstance it should weigh in too.

Grass and weeds, no matter the season, are going to seed - and those seeds are going to blow into your nice cultivated garden areas.  Given the much nicer living conditions, they're going to thrive. Dug gardens are going to get grown into - and raised beds be grown under and rained down on.  Not even containers are going to be weed free.
Common sense really - maintained yard is going to allow less rubbish and weeds in there.

A quick going over with the mower and all is set to rights.  With the addition of the trampoline for the kiddies, yard space is now a precious commodity.
Good thing the garden is in the other direction - in a fiddly corner of the yard that is too small for anything else.
Around the other side past the pool is the paved area for bbq and the like - so I don't have to worry about my area being needed for that.


Weeds and grass had run rampant over an area I wanted to prep as a squash patch this year - a narrow strip by the fence and driveway (that isn't used except for me to stack junk I'm working on).  Despite the picture it does get a lot of morning and afternoon sun - leaving the midday hot part of the day in partial shade.  Seems like a good combo to try, and if it doesn't work out - I can just let the grass take it again.
I knocked this down with some spray I get from the farm, but roundup or good old fashioned gloves would have done the trick. I had it, it cost me nothing, so I sprayed it down 2 weeks before this picture.  I SHOULD have been ready to plant by now, but I'm running VERY late this year.  Over the next couple of days I'll be pulling the remaining stubborn stems, digging down about 6 inches, laying landscaping cloth and backfilling.  I'll add some additional goodies like worm castings, perlite, and coconut coir to bring the soil up a bit and plant. I won't be using the WHOLE strip this year - just enough to test the water.

With the balance sheets showing the garden hundreds of dollars in the black from last year (I stopped my hard n fast 'accounting' in Autumn. I decided to set myself a budget for spending. For Spring I splurged and laid down $100 for supplies.
Of course I shopped around to drive that dollar as far as I could, and it wasn't just limited to this stuff - sand for the kids sandbox was in there, as well as lumber for a new 4 x 4 garden bed, fire ant control... and  of course a soda.

Oh the humanity!
Kids love sand, but they are outgrowing the kiddie sized sandbox - also not to others - DON'T PUT IT CLOSE TO THE POOL! After balancing the PH and getting the chlorine and a winters worth of leaves out - I was now faced with a 1/4 sandbox of sand.
Trying to get it out burnt out the pool pump - so swimming season is put off by 2 weeks.

Her Majesty is not amused by this.


Don't know about your world, but in mine time can be just as precious commodity as money and space.  Kids activities like trampolining, swimming, swimming, and playing in the sand give me the opportunity to either join in, or get some of the smaller tasks done without having them underfoot.. or alternatively have them join me and get used to working there as well.

Need to spread ant killer, weed n feed, fertilizer, or any of that stuff?  Don't need a fancy spreader, and don't need to wear out your pitching arm or gloves either.

Any of those little plant pots that stores give you plants in will do the trick - restrict some of the holes with a sheet of paper inside if the flow is too much, and just dunk your cup then wave it in front of you.. Does exactly the same thing and costs nothing.

This year I want to include more yard projects here - as there is more to gardening than just a garden.

Cheers.. still catching up, so more to follow.

Saturday, March 29, 2014

Winter, what happened?

Winter has come and gone, and Spring arrived on the 20th.. so what happened?  The answer is 'not much'.

Seeds were planted a couple of weeks too late at the end of Autumn, and between hungry squirrels, cold snaps, and just not enough time to build up robust plants - I ended up busy with house projects (like working out hot to heat a huge house when the old inadequate furnace gave up the ghost) and in the end, although it doesn't get freezing cold in South Georgia, it got to the point where I decided it was more fun to close shop for the Winter and move on to woodworking and DIY projects that were piling up.

Yep, that's a fine patch of weeds up there ain't it?

 Things WERE learned though - apart from 'don't plant too late in Autumn'. Brussels Sprouts don't mind the cold, nor Kale.  This Kale was planted last summer and transplanted to the back of the bed.  The sprouts I'm not sure about - 2 of the plants (in the middle) have some little nubs on them, but the outer ones were stumped. Since this photo they've grown even bigger - so don't crowd your sprouts - leave a square in between and work out something that can grow up between them, and preferably up OVER them.
A good friend gave me book on companion planting for Xmas, so I'll be reading up on what I can do with a vacant square - because sprouts should be on the menu.

If you want something to grow over the winter - Turnips seem to be up there too. These weren't even planted! I'd grown Turnip greens next to an old pepper plant in the Spring of last year, and come late Autumn lookie what I find! Turnips sprouting up all in there.
I'm going to pull them soon and make way for eggplant and peppers again.  I had good luck and very high yields last year with those, so much so that I ended up loosing produce 'on the vine' because I couldn't find time to pick them all.. happy problems!

Other winter problems - cold/hot/cold/hot and sun doesn't do cheap plastic any good. My old racks literally collapsed over the winter.
Mind you these were cheapie 'WalMart Specials' and meant for indoor use. I've used them for the last 5 years, so they did their job and can go off to the graveyard happy.  I do have something sturdier to replace them, so it's all good.

I'll be using my tactic of sprouting replaceables like lettuce and others in pots and moving to the garden as they are ready. It's a good system that's served me well - although the pots could do with a good recycling of soil.

The herb garden was looking a little ratty (well rattier before I cleaned out the leaves and such). Sage, Thyme, and Chives lasted the winter out - Basil, as expected, dried and died - but this was planned to. This was taken before I pulled the plants and crushed the seed pods, giving me ample seed for this years Basil.  Those 9 plants from a pinch of seeds gives back more than you originally buy..  This years replant will use 4 plants per square and only 2 squares - I *STILL* have dried Basil in the kitchen from last Autumn. I'm going to try some new herb drying methods this year, so we'll see how they turn out.  I have one Garlic plant there - but that's ok as I don't really cultivate Garlic at all - I plant it as a pest deterrent and only use the greens in cooking, where they make an excellent substitute for 'proper garlic'.

My Nemesis.. fire ants.  When I moved in here the backyard was one huge fire ant colony - the grass was thinned and rubbish and these little bastards were everywhere. I eradicated them and revived the lawn.. it's green, but needs more grass - but like roaches, so long as you have neighbours, you'll have these guys moving in.  What I used the last 2 years isn't as responsive as what it once was - I'm putting it down to both age and the little beggars getting used to it... These guys I've chased all over the yard and have now narrowed it down to just 2 small mounds.. I've stocked up on 3 different types of baits to get them out before the weather gets hot.

With heating problems over the winter solved by only heating the required areas of the house (living room, bedrooms, office - kitchen and laundry heat themselves to an extent), Vermicomposting slowed right down. The temps dropped inside pretty low, but not low enough in the tubs to do in my worms.  I moved one tower under the stairs next to the water heater, but that only had room for one with the current arrangement - keeping it within the 60-80 degree 'sweet spot' - this let me compare the effects of temps directly between 2 bins.  As expected the one kept just 10 degrees warmer did quite well - whereas the other slowed to a snails pace.
At the end of winter I had around 50 lbs of castings and not much to do with them at the time. I've since done a BIG amendment of soil in the gardens, and let the bins have a 'vacation' - as in not emptying them and letting the worms work through all the lower levels.  If this plays the way I hope it will, I'll start the Spring season with several trays empty and a good concentration of worms working on 'the tray at hand' rather than spread throughout the system.  This may cause a slight population decrease, but that's what this experiment is about.

Oh never full compost bin, how I love you! This is post Autumn/Winter cleanup. With all the leaves from the frikken magnolia tree swept up, and all the Xmas paper broken down - this baby is STILL only 3/4 full.  it just keeps breaking down and feeding that lawn!  This year I plan to sheath the lower half in plywood and put in a door so I can shovel and sort out some of that near year-old goodness and spend less on potting soil and the like. I think I'll put in a new sandbox for the kiddies while I'm at it.  This also took the brunt of the vermicomposting slow down  - so like my own private landfill it's been chugging away on paper waste over the Winter as well. Even if I have to wait another year to get something out of his, it's still doing a bang up job of keeping stuff out of the trash can.


So, with some small amount of time on my hands it's time to get things in the ground for Spring. These pictures were taken Pre-Solstice, and I've gone through and weeded the beds, even planted few early starters, but it's still good and busy times ahead. I have plans for Spring/Summer and it's all going to start now.  My garden supplies for the year have been bought, we'll catchup with the 'State of the Yard',  go through the construction of a new garden bed, HOPEFULLY start our dedicated squash bed, and start the prelims for April potatoes!

Lets get it started!


Sunday, November 3, 2013

Out with the old.....

Something I've been getting better at this year is the understanding that many things aren't going to be around forever.  When I first started out with my first garden, I fought tooth and nail to try and keep plants going - even though they would eventually die off.  Now I enjoy sitting and watching things go through their natural cycle, watching one set of plants come into their own as another is cycling out.  In this case it's the Basil - phasing out as the sage comes in.
The dill, cilantro and parsley have long been removed, and in their place I've just planted some Oregano - something I've had not much luck with in the past - but then again I said the same of Parsley last year, and I have a mason jar full of dried parsley in the kitchen this year.

Basil is a plant I try and encourage people new to growing things to try - it was one of my first successful plants, and to this day I've had constant good luck growing it (not to mention it's very useful in the kitchen).  2 squares planted with 4 plants each seems to be the 'magic number' for me.  More than that and you get get smaller plants, one by itself doesn't grow much bigger than the 4.
It sprouts fast, grows quick, and with that amount of plants you'll be in fresh basil very quickly.
It thickens as you harvest it, so the more you cut, the more you get - and soon you'll find yourself with an abundance.  Going back over the blog here you'll see how easy it is to dry and preserve, or refrigerate / freeze with a little oil and a food processor. As it winds down I'm entering the final stage - harvesting seeds.  Wait until the flower stems die back then run them through your hand, then crush the seed pods by pinching them and rubbing.  The seeds fall into your hand and much of the waste blows away in the breeze.  One stalk easily gives up more seeds than you planted, and a single plant could give up more than you bought in a seed packet.

My little squash plant is ending it's run as well.  As the only surviving squash it's done very well - giving up several 'single serve' butternut squashes.  There area  couple still there that are growing and one that I'll probably eat next week.
Next year I hope to have a dedicated squash patch by the edge of the driveway, but for now I'll let it run it's course.  I don't think I'll be planting any Winter squash - I don't really have the space prepared for them this year.


Brussels Sprouts that were planted in Summer are coming up nicely - nothing on them yet, but we'll wait and see. You can see the difference in the color of the plants.  These are meant to be growing at this time of year.

I've only tried to grow these once before - and that wasn't very successful (albeit in a container), so I'm curious to see how they turn out - they have plenty of room at just one per square.


The rest of the garden is being planted out with things I grew successfully last year - lots of Beets, Spinach (shown), Swiss Chard, and Lettuce.
As each square comes up with it's quota, it's mulched with verimcompost (worm poo).  It will act as a slow release fertilizer, lock in moisture, and hopefully help keep the squirrels away. There is a race at the moment with the Beets, between getting the plants big enough to mulch, and them digging up the seeds.
 Peas are starting to poke up from the patch I planted - a single long row where last year there were beans and peas up against the wall.

I've forgone planting beans this Autumn, as the results were mediocre compared to the blast I had in the spring - I'll probably use the patch by the wall to alternate between the two over Autumn/Winter and Spring/Summer.  Possibly using it for carrots to fill the gap between when the beans die off and the optimum planting time as things cool down in Autumn.

Germination containers are currently being left alone, with the exception of one being kept running for lettuce - as the nights get colder the ground will hold temps better than an exposed container - it's the tradeoff for the early start they can help you get in spring.

The garden itself is getting sparse at the moment - as many of the things planted out are going to be slow growing, and much of the current fresh produce has been picked as needed. Peppers and Eggplant are slowing down production, and each plant is being pruned back as it stops.  Over winter some will survive, giving me an early jump on next year.

The last couple of weeks have shown me the difference between a sustaining garden and one that supplements - with most of my meals coming from the backyard due to my recent health issues, I see that I will certainly be expanding in time to catch the spring plant - more than likely another 4 x 4. This year I expanded by a single 4 x 4 bed, and managed to keep up with things rather well.
Although I shifted my diet radically to vegetable intensive as a temporary necessity (I'm not going to say Vegetarian, as it would be a misrepresentation - for instance I still eat fish), I've been very impressed with the results, and will be probably continuing it even though I may not need to.  I've always been at the least a 'meat and 3 veg' man - but I think that too much meat is a bad thing, and it's hard to steer away from that in todays society.
I'll probably be introducing red meat again soon, but probably only one day a week (Sunday), and sticking to my Catholic roots and make 'Fish on Friday' a regular thing.  All fast food was eliminated, as was the caffeine laden soda, and I immediately dropped about 5lbs.  I noticed no difference in energy while working out at the farm past the first day (where I was still a little sick), and with some adjustments to my eating times I've felt much better than I have for about 6 months.

Basically having 5 meals a day - in the same way I did back in my homeland.  Morning and Afternoon Tea fill the space between the 3 main meals, and a quarter cup of peanuts or trail mix with a glass of milk is all that's eaten there - more like a snack really.

I'll keep at it and see how things progress - I doubt I could ever do the full Vegetarian thing, but I am all for giving it more room on the plate.

Cheers.